Stop Espresso Channeling Fast: WDT First for Home and Pro Baristas
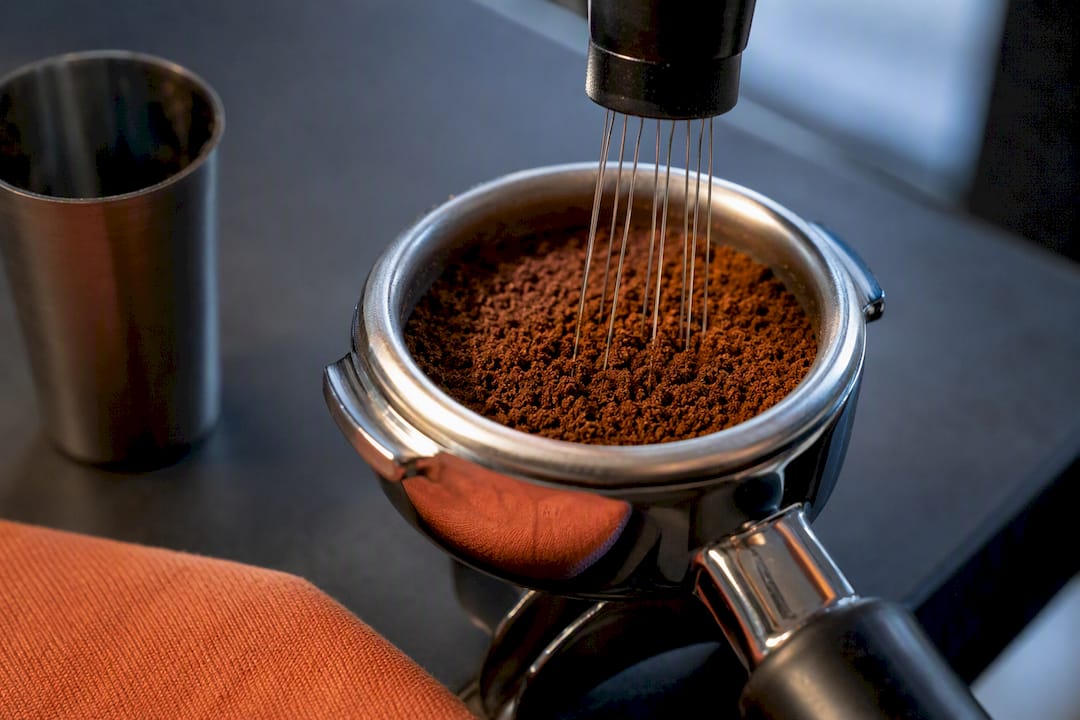
Channeling is almost always a puck-prep problem, not a machine problem. The fix, in order: use WDT (Weiss Distribution Technique) to break up clumps, level the grounds, tamp perfectly flat, and weigh your dose within 0.2 grams every time. Confirm the fix with a bottomless portafilter before you touch the grinder or blame the machine. Skip technique and go straight to equipment, and you’ll chase the wrong problem for months.
TL;DR:
- Proper technique, especially using Weiss Distribution Technique and weighing doses within 0.2 grams, is the main fix for channeling, not equipment upgrades.
- Signs of channeling include uneven water flow visible with a bottomless portafilter, puck craters, holes, or early blonding during extraction.
- Following a strict order—WDT, distribution, tamping, then grind adjustment—ensures consistent results and prevents unnecessary troubleshooting.
- Regular cleaning of the shower screen and checking puck fit are crucial steps to prevent water unevenness caused by machine or basket issues.
- Consistent, high-quality beans from a reliable supplier significantly reduce the need to re-dial your setup, making fixes more stable over time.
Table of Contents
- How Do You Know If Your Espresso Is Channeling?
- What’s the Right Order for Fixing Channeling?
- How Do You Actually Perform WDT, Distribution, and Tamping?
- When Is Your Grinder the Real Problem?
- Could Your Machine Be Causing Channeling?
- Your Repeatable Workflow to Stop Channeling Every Shot
- How Moustachecoffeeclub’s Guides Support Consistent Shots
- A Straight Answer on Where Channeling Actually Comes From
- A Consistent Bean Supply Makes Dial-In Easier
- Sources
- FAQ
How Do You Know If Your Espresso Is Channeling?
A bottomless portafilter tells you in about eight seconds. Watch for side jets shooting out at an angle instead of a steady central stream, drips that start uneven from one side of the basket, or one spot on the puck turning pale (blonding) way before the rest of the coffee finishes extracting. Any of those means water found a low-resistance path through the bed and blew past most of the grounds.
The spent puck confirms it after the shot. Pull the portafilter and look for:
- Craters or divots near the center, where the tamper or distributor didn’t reach evenly
- A donut ring with a soft or wet middle, usually from an uneven distribution before tamping
- Visible holes straight through to the basket, the clearest sign water tunneled through
- A dry, crumbly puck in patches while other areas look dense and wet
Taste and flow tell the same story from a different angle. A shot that gushes in the first three seconds, finishes too fast, and somehow tastes sour and bitter at once is a channeling shot almost every time. A bottomless portafilter remains the single best diagnostic tool for catching this before you’ve wasted a whole bag guessing.
What’s the Right Order for Fixing Channeling?
Most people fix channeling backward. They regrind, buy a new basket, or blame the beans before they’ve even distributed the puck properly. Work through these steps in order, and don’t move to the next one until you’ve actually nailed the one before it.
- WDT first. Stir the grounds with a fine needle tool to break up clumps before anything else touches the puck.
- Distribute second. Level the loose grounds so the surface is flat before you apply any pressure.
- Tamp level, third. Lock in that even bed with consistent, level pressure, not brute force.
- Weigh every dose. Match it to your basket size and hold it within about ±0.2 grams shot to shot.
- Only then, check the grinder. Uneven particle size (a mix of dust and boulders) becomes the suspect once technique is solid.
- Last, check the machine. Pre-infusion, shower screen, and pressure stability come after everything above is ruled out.
This isn’t an arbitrary sequence. Practitioners across the specialty coffee world converge on the same order: WDT, then distribution, then tamping, and grind adjustments only after that. Skipping WDT and going straight to a fancy leveling tool is one of the most common mistakes home baristas make, because a distributor smooths the surface without ever breaking the clumps hiding underneath it.
Pro Tip: Weigh your dose to 18.0 g ± 0.2 g for a standard double basket. That tolerance isn’t fussy for its own sake, it’s the range where dose consistency actually changes extraction repeatability shot to shot.
How Do You Actually Perform WDT, Distribution, and Tamping?
WDT. Use a needle tool with prongs around 0.3 to 0.4 millimeters thick. Thinner needles cut through and break clumps; thicker ones just shove clumps sideways without opening them up, which Espresso Academy’s testing confirms makes a measurable difference in how evenly water flows through the bed. Move the needle top to bottom, angling it so it actually reaches the floor of the basket rather than skating across the surface. Ten to fifteen seconds of steady stirring across the whole basket is usually enough. Rushing this step defeats the purpose.
Distribution. After WDT, you’re just settling and leveling loose grounds, not compressing them. A three-blade distributor set to the basket depth and given one or two light rotations works well. If you don’t have one, a few gentle taps to settle the grounds followed by a light finger swipe across the rim does the job. Don’t over-distribute. Spinning a leveling tool for ten rotations trying to get a “perfect” surface can actually pack grounds unevenly against the basket wall.
Tamping. Stand square to the portafilter, keep your wrist straight, and press straight down so the tamper base stays level with the basket rim, not tilted. Check that the tamper edge nearly touches the basket wall all the way around; a visible gap on one side means uneven compression on that side. Consistent, repeatable pressure matters more than hard pressure. Tamping harder than roughly 15 to 20 kilograms of force shows essentially no extraction benefit once the puck is level.
- Skip the aggressive twisting “polish” tamp. It burnishes the surface and can create a crust that cracks under pressure.
- Don’t rush WDT to save ten seconds. That’s the step doing most of the work.
- Don’t tamp off-angle even slightly. A one-degree tilt is enough to create a thin side.
When Is Your Grinder the Real Problem?
If your WDT, distribution, and tamp are all dialed and you’re still seeing side jets, look at the grinder. Clumping right out of the chute, a mix of fine dust and coarse boulders in the same dose, or a dose that swings by more than half a gram between pulls all point to the burrs, not your technique.
Basic maintenance solves this more often than people expect:
- Brush out the burr chamber and clean static buildup weekly with regular use
- Check burr alignment; a wobble here creates inconsistent particle size no matter how good the burrs are
- Purge a small amount of old grounds before dosing if your grinder retains coffee between uses
- Replace burrs on a schedule appropriate to your grinder and volume, since dull burrs generate more fines that clump
Basket fit matters just as much as the grinder. Measure your basket’s internal diameter against your tamper. A gap as small as half a millimeter between tamper and basket wall lets grounds sit uncompressed at the edge, and that’s exactly where side channeling starts. Precision baskets, a properly sized calibrated tamper, and an accurate gram scale are the three tools worth owning before anything fancier. If technique and dose are solid but channeling persists, the grinder or basket mismatch is the next place to look, not a machine upgrade.
Could Your Machine Be Causing Channeling?
Pull the shower screen and check it before you touch anything else. Grounds and oil buildup clog some holes while leaving others open, which sprays water unevenly onto the puck and channels it before extraction even starts. Cleaning the shower screen regularly is a five-minute job that fixes more channeling than most people assume.
Pre-infusion is worth testing next. It wets and gently seats the puck before full pressure hits, giving small surface imperfections a chance to swell shut rather than turning into channels immediately. Run the same prep twice back to back, once with pre-infusion on and once off, and watch the first five seconds through a bottomless portafilter. The difference is usually obvious.
- Inspect the shower screen for uneven or blocked holes
- Test pre-infusion on vs. off with identical puck prep
- Only adjust pressure or OPV settings after technique and grinder are confirmed clean
A puck screen placed on top of the grounds can also diffuse an uneven shower spray as a stopgap while you sort out the real cause.
Your Repeatable Workflow to Stop Channeling Every Shot
Turn the whole process into a habit, not a diagnosis you run only when a shot goes sideways.
- Grind fresh, right before you dose
- WDT to the floor of the basket, 10 to 15 seconds
- Distribute lightly, no aggressive spinning
- Tamp level, checking rim contact
- Confirm dose on the scale (±0.2 g) and basket match
- Check the pull on a bottomless portafilter before serving
If spritzing shows up anyway, escalate in order: re-do WDT, recheck your dose, inspect the grinder for clumping, then check the shower screen and basket fit.
How Moustachecoffeeclub’s Guides Support Consistent Shots
Technique only gets you halfway if the beans themselves shift roast to roast. Moustachecoffeeclub’s education hub pairs directly with the fixes above: the light roast dial-in guide addresses why light, Nordic-style roasts show channeling faster than dark roasts, the equipment cleaning guide covers shower screen maintenance, and the grind chart gives starting points before you fine-tune with WDT.
A Straight Answer on Where Channeling Actually Comes From
Most home espresso channeling disappears the moment someone adds WDT and starts weighing doses. It’s rarely the grinder, and it’s almost never the machine. Get a bottomless portafilter early. Watching a shot fail visually teaches you more in one pull than a week of guessing by taste ever will.
— Sean
A Consistent Bean Supply Makes Dial-In Easier
Every fix in this guide assumes one thing you don’t always control: a bean that behaves the same way shot after shot. Buying whatever’s on sale means re-dialing your grinder every few weeks as roast dates and origins shift underneath you. Moustachecoffeeclub ships single-origin, ultra-light Nordic-style roasts fresh and roasted to order, so the variable that trips up most home setups, inconsistent roast age, stops being a variable at all.

That predictability matters more than it sounds. A bean roasted the same way on a known schedule means your grind setting and dose from last week still apply this week, so channeling fixes actually stick instead of getting undone by a new bag with a different density. Pair a Moustachecoffeeclub subscription with the coffee education hub for origin reports and brewing guides that go deeper than any single blog post, and start your first subscription order to see how much less re-dialing you do.
Sources
For deeper technical detail, see the Weiss Distribution Technique breakdown and Espresso Academy’s distribution and tamping tests.
- Puck screens: how much do they really impact extraction? — Clive Coffee
- Weiss Distribution Technique — Barista Hustle
- Espresso distribution and tamping: what science really tells us — Espresso Academy
- Fix Espresso Channeling — Espresso Advice
FAQ
What Causes Espresso Channeling?
Channeling happens when water finds a low-resistance path through the coffee puck instead of flowing evenly, usually caused by clumped grounds, uneven distribution, or an off-level tamp.
How Do You Get Rid of Channeling?
Fix it in order: use WDT to break up clumps, distribute the grounds evenly, tamp level, and weigh your dose within about 0.2 grams before checking the grinder or machine.
What Is the 30 Second Rule for Espresso?
It refers to targeting a standard extraction window for a double shot; a shot that finishes much faster than usual is a strong sign of channeling rather than a grind problem.
How Do You Know If Your Espresso Is Channeling?
Pull the shot in a bottomless portafilter and watch for side jets, uneven drips, or early blonding in one spot, then check the spent puck for craters, holes, or a donut-shaped wet ring.