How to Dial In Light Roast Coffee for Home Baristas
If you’ve ever pulled a shot of light roast coffee and gotten a face-puckering sourness instead of the bright, complex cup you expected, you already know that learning how to dial in light roast coffee is a different game than adjusting a medium or dark roast. Light roasts are denser, less porous, and packed with preserved acids that require more extraction energy to unlock properly. The usual espresso parameters most home baristas start with will consistently under-extract them. This guide breaks down every critical variable so you can stop guessing and start tasting exactly what your coffee is capable of.
Table of Contents
- Key takeaways
- How to dial in light roast coffee: understanding what you’re working with
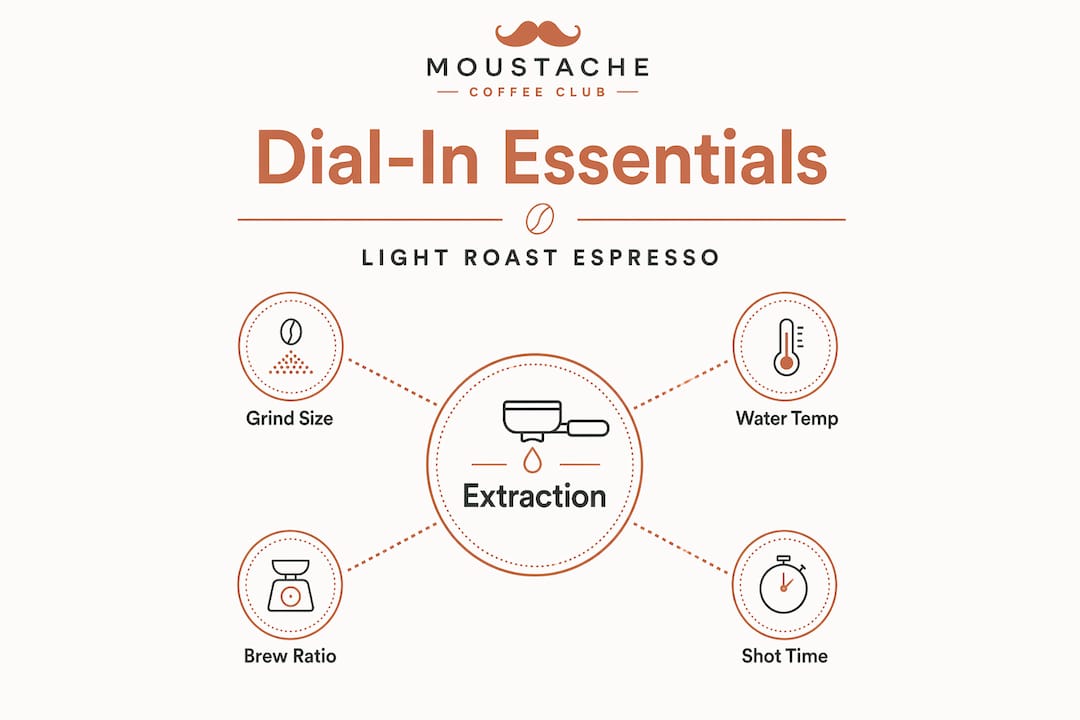
- The four core variables for dialing light roast espresso
- Advanced puck prep and extraction techniques
- Light roast brewing beyond espresso
- My honest take on dialing in light roasts
- Dial in with better beans from Moustachecoffeeclub
- FAQ
Key takeaways
| Point | Details |
|---|---|
| Finer grind is non-negotiable | Light roast beans are denser and need a significantly finer grind to increase surface area and extraction. |
| Temperature matters more than you think | Brew at 94–96°C to give light roasts enough thermal energy for full, balanced extraction. |
| Adjust one variable at a time | Change grind, ratio, or temperature separately so you can accurately diagnose taste problems. |
| Puck prep prevents channeling | Even distribution and level tamping are critical when using the fine grinds light roasts demand. |
| Pour-over rules shift too | Hotter water and a longer bloom phase apply to manual methods, not just espresso. |
How to dial in light roast coffee: understanding what you’re working with
Before you touch your grinder, you need to understand why light roast coffee fights back. Most brewing guides assume a medium roast baseline, and that assumption breaks down fast with lighter beans.
Physical density changes everything. Light roast beans are not roasted long enough to break down their cellular structure the way dark roasts are. The result is a denser, less porous bean that resists water penetration. Light roasts require more extraction energy than darker roasts because of this physical reality. Water simply can’t pull flavor compounds out as easily.
Here’s what that means in practice for your brewing:
- Grind size: Coarser grinds leave too little surface area exposed, so water passes through without extracting enough soluble material. You need a finer grind to compensate.
- Water temperature: Lower temperatures don’t provide enough energy to dissolve the compounds locked inside dense light roast cells. Cooler water actively works against you.
- Brew ratio: Traditional 1:2 espresso ratios concentrate the under-extracted flavors, making sourness worse instead of better.
- Contact time: Light roasts need longer exposure to water to reach the same extraction percentage as a medium roast at the same grind setting.
- Preserved acids: Because roasting stops earlier, citric and malic acids remain largely intact. These are good acids when extracted correctly. They read as sourness when extraction is incomplete.
The most common mistake home baristas make is using their medium roast dialing as a starting point. Under-extraction in light roasts is almost always caused by applying medium roast grind and temperature settings without adjustment. You are not tweaking a familiar recipe. You are starting a new one.
The four core variables for dialing light roast espresso
Once you understand the “why,” the adjustments become logical. Here is how each variable works and how to move it intelligently.
1. Grind size
Go finer than you think is reasonable. Espresso grind for light roast is typically 2 to 5 steps finer than your medium roast reference point on most grinders. Finer particles mean more surface area, which means water can pull out more soluble material in the same amount of time.
2. Water temperature
Target 94 to 96°C. A finer grind, higher temperature, and longer brew ratio are the three pillars of light roast extraction. If your machine can’t consistently reach 93°C, persistent sourness despite a very fine grind is often a hidden machine limitation rather than a technique problem.
3. Brew ratio
Start at 1:2.5 and work toward 1:3 if sourness persists. A common starting recipe is 18g of coffee in with 45g of liquid out at 95°C. Traditional 1:2 ratios concentrate whatever flavors are extracted, and with a light roast, those flavors are often unbalanced acids.
4. Shot time as an output variable
This is where many home baristas get confused. Pull time in light roast dialing is an output variable, not a target you set directly. You adjust grind size, dose, and yield, then observe what time results. A well-dialed light roast espresso typically runs 30 to 45 seconds.
Here is the step-by-step dialing process:
- Start with 18g in, target 45g out, water at 95°C.
- Pull your first shot and taste it. Sour and thin means under-extraction.
- Grind one or two steps finer. Pull again.
- Keep going finer until the shot slows to 30 seconds or longer.
- If sourness persists past a fine grind, increase your yield to 50 or 54g out.
- If you get a dry, chalky bitterness, you’ve gone too far. Step back one grind notch or reduce yield slightly.
- Once your shot is balanced, note every setting so you can replicate it.
Pro Tip: Tasting for “balanced acidity” versus “sourness” is a skill. Good acidity is bright and pleasant, like lemon zest. Sourness is sharp and hollow with no sweetness behind it. If you taste no sweetness at all, you are under-extracted regardless of what the timer says.
Advanced puck prep and extraction techniques
Getting your variables right is half the battle. The other half is physical: how you prepare the puck before you pull the shot.
Because light roast espresso requires a finer grind, the risk of channeling increases significantly. Channeling happens when water finds a path of least resistance through the puck rather than saturating it evenly. The result is simultaneous sour and bitter flavors in the same shot because some grounds are over-extracted while others are barely touched. Uneven distribution causes channeling, which is why puck preparation is especially critical with light roasts.
Here are the techniques that make a real difference:
- Weiss Distribution Technique (WDT): Use a thin needle tool to break up clumps and distribute grounds evenly in the portafilter before tamping. This single step dramatically reduces channeling in fine grinds.
- Level tamping: Apply even, vertical pressure with your tamp. Any tilt creates a thicker side and thinner side in the puck, and water will rush through the thin section every time.
- Pre-infusion: Pre-infusion at low pressure for 7 to 10 seconds before full extraction pressure allows dense light roast pucks to swell and saturate evenly. This reduces channeling risk and improves extraction uniformity. If your machine has a pre-infusion setting, use it every time with light roasts.
- Pressure profiling: If your machine supports it, a gentle pressure ramp from 4 to 6 bar before reaching 9 bar gives the puck more time to settle. This is not required, but it is a meaningful upgrade when everything else is already dialed.
Pro Tip: Watch your espresso flow. A well-extracted light roast shot should start slow, thicken to a honey-like stream, then finish cleanly. If you see fast, watery flow from the start, channeling is almost certainly happening and puck prep needs attention before you change any other variable.
Puck preparation and distribution are more critical for light roast espresso than any other roast level precisely because of fine grind sensitivity. Don’t skip these steps and then wonder why your grind adjustment isn’t fixing the problem.
Light roast brewing beyond espresso
The same dialing principles apply when you move away from the espresso machine. Light roast coffee brewing in pour-over and French press methods responds to the same logic: more heat, more surface area, more contact time.
| Brew method | Water temperature | Starting ratio | Bloom or pre-infusion | Key adjustment |
|---|---|---|---|---|
| Pour-over | 200–205°F (93–96°C) | 1:15 to 1:17 | 30 to 45 second bloom | Extend bloom for dense light roasts |
| French press | 200–205°F (93–96°C) | 1:15 | 4 minute steep minimum | Increase to 5 minutes if flat or sour |
| AeroPress | 205°F (96°C) | 1:12 to 1:15 | 30 second bloom | Invert method helps with contact time |
| Batch brew | 200°F (93°C) | 1:16 | Built-in bloom if machine supports | Use pulse brewing for even saturation |
Light roast brewing methods benefit from hotter water in the 200 to 205°F range and a longer bloom phase of 30 to 45 seconds. The bloom phase matters more than most home brewers realize. It saturates the grounds and releases trapped CO2, which would otherwise create a barrier between the water and the coffee during extraction.
Water quality is another variable that gets ignored until it causes a problem. Filtered water with balanced mineral content is critical for extracting delicate light roast flavors because water that is too soft or too hard will mute or distort taste regardless of how well everything else is dialed. A good starting point is filtered tap water or a product designed for specialty coffee brewing.
For step-by-step pour-over brewing guidance tailored to light and ultra-light roasts, the Moustachecoffeeclub pour-over guide goes deep on technique. For French press drinkers, the French press brew guide covers ratio, steep time, and grind adjustments specific to lighter coffees.
My honest take on dialing in light roasts
I’ll be direct: dialing in a light roast espresso is one of the more humbling experiences in home coffee. I’ve watched experienced baristas spend a full bag of coffee chasing a balanced shot, getting increasingly frustrated because their usual instincts kept pointing them in the wrong direction.
The biggest mental shift I had to make was treating pull time as an observation rather than a goal. I used to chase the 25 to 30 second window because that’s what general espresso guides recommend. With light roasts, that instinct produces sour, thin shots every time. Once I accepted that 40 seconds was not a problem but a sign of correct resistance, everything started making sense.
I’ve also learned to trust taste over numbers. The numbers give you a starting framework, but your palate tells you whether you’re on the right track. When I taste a shot and I can identify specific fruit notes, even faint sweetness, and the acidity has a clean finish rather than a lingering sharpness, I know the extraction is close. That sensory feedback loop is faster than any data point.
My personal go-to when working with a new single-origin light roast is to start with a conservative dose (17g), a generous yield (51g), 95°C, and WDT plus level tamping as non-negotiables. From there, I grind finer until the shot slows, then taste. It usually takes three to five shots to land somewhere worth repeating. That’s not failure. That’s the process.
The reward is real. When a light roast is properly dialed, you get flavors that darker roasts simply cannot offer: the jasmine florals in an Ethiopian natural, the bright red fruit in a washed Colombian, the clarity that reminds you coffee is actually a fruit. It’s worth the patience.
— Sean
Dial in with better beans from Moustachecoffeeclub
Every technique in this guide works best when you start with high-quality, freshly roasted beans. The variables you’re adjusting interact directly with how fresh and well-sourced your coffee is.

Moustachecoffeeclub sources ultra-light, Nordic-style single-origin coffees from Ethiopia, Colombia, and beyond, roasted to order so you receive beans at peak flavor. Each bag comes with origin reports and brewing notes that support your dialing experiments by telling you exactly what flavor profile you’re chasing. Explore the coffee subscription options to receive freshly roasted light roast beans on your schedule. The coffee education hub also has detailed brewing guides if you want to go deeper on any technique covered here.
FAQ
What grind size should I use for light roast espresso?
Light roast espresso typically requires a grind 2 to 5 steps finer than a medium roast setting. The denser bean structure needs more surface area to extract properly at espresso pressure.
Why does my light roast espresso taste sour?
Sourness almost always signals under-extraction. Start by grinding finer, and if sourness persists, increase your water temperature to 94 to 96°C or raise your brew ratio to 1:2.5 or 1:3.
What brew ratio works best for light roast espresso?
A starting ratio of 1:2.5, such as 18g in and 45g out, is recommended. Traditional 1:2 ratios tend to concentrate under-extracted flavors and amplify sourness.
Does pre-infusion help with light roast espresso?
Yes. Pre-infusion at low pressure for 7 to 10 seconds allows the dense light roast puck to saturate evenly before full pressure is applied, reducing channeling and improving extraction quality.
Can I use the same approach for pour-over and French press?
The same principles apply: use hotter water (200 to 205°F), extend the bloom phase to 30 to 45 seconds, and expect slightly longer brew times than you would use for a medium roast.
Recommended
- How To Brew Pour Over Coffee | Step-by-Step Guide | Moustache Coffee Club
- Coffee Education Hub | Ultra-Light Nordic-Style Brewing Guides & Origins | Moustache Coffee Club
- How to buy specialty coffee: expert tips for flavor and quality | Blog | The Moustache Coffee Club
- Roast to order coffee: advantages for single-origin lovers | Blog | The Moustache Coffee Club